Building a house on your own is never easy. Making a conscious decision to build a Passive House in rural Pennsylvania is borderline crazy. It is arguably a lot more expensive to build than conventional minimal code construction while suitable materials are hard to come by on the U.S. market.
The Next Of Kin (NOK) project explains why the above statements, for the most part, are industry myths.
Can We Build It?
YES, WE CAN.
The Idea
was to create a structure based on a modern-day Bauhaus movement in rural Pennsylvania that embraces function slightly over design and closely follows Passive House principles. The project took place in Bucks County, PA, and was completed in December of 2017. It took two years to research and about a year to build. It is believed to be the first true Passive House in Bucks County with pending certification. The construction process has been fairly well documented to help spread the word about this cool, yet very simple concept, as well as some interesting building techniques, learned along the way.
se
Thermally broken foundation
The major twist of the Passive House concept is the absence of a thermal bridge. By partially quoting Wikipedia, this could be defined by any structural component with a higher thermal conductivity than the surrounding materials that can create a path of least resistance for heat transfer. In layman’s terms, it’s a thermal portal that needs to be broken. In order to achieve this, the entire house envelope must be sealed and air-tight from the ground up.
It’s all about insulation
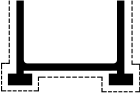
Below are a thermally broken foundation and basement wall detail for the NOK Passive House project. As shown, an insulation layer should run continuously under footings, walls, and basement slab. The amount of insulation is calculated based on the size of the house and the local climate. The type of insulation is limited to sturdy 25-40 PSI foam since it needs to support the distributed weight of the entire house. In this case, it is 10” of EPS foam on the walls, 8” under the entire footing perimeter, and about 10” under the basement slab.
Typical passive house foundation detail.
And yes, of course, I was worried about the weight. Really worried …until I saw an excavator lively crossing over one of those foam slabs barely doing any damage. My peace of mind was fully restored that day.
There were also some concerns about material sourcing and the price tag. Fortunately, it was somewhat easier than I thought. There were local suppliers in the area willing to work with contractors, builders, and homeowners alike. The prices were marginally different, so the winner was the company with the lowest delivery cost. The slabs usually come fresh off the production line, very well packed, cleanly cut, and ready to go.
The foam slabs are completely laid out underneath the future foundation. The foam block structure is held in place by fiberglass rebar stakes to eliminate the possibility of the thermal bridging and to make concrete pour saferThe foundation is finished. The separate footings and concrete forms seen inside the perimeter (each sitting on its own foam block) are for every column that supports the entire structure.The completed look of the basement exterior insulation. Notice the continuous wrap around the footing to create a bridge-free “coat” for the basement walls.
Fenestration: Minding the sunlight
The S/SE facade is designed to have the most amount of glass surfaces to capture and conserve solar energy. This, among other benefits, helps regulate interior temperatures and significantly lowers your electric bills. Large glass area is one of the main requirements of the Passive House concept but there is one caveat: the bigger the house, the harder it is to manage temperature fluctuations and keep the interior from overheating during summer. To mitigate possible overheating, we built a 3-foot overhang structure and a 5-foot cantilever around the largest windows. They help the house to stay cooler when the sun is high but still capture a lot of daylight in the winter months.
The quest for the right windows
The windows for a Passive House, a marvel in itself, are triple pane blocks of glass sitting inside the wood, plastic, fiberglass, or aluminum frame. While all the aforementioned materials are acceptable choices for passive house construction, the price quotes varied vastly with PVC still being the cheapest option.
Window installation
Since the majority of residential builders do not deal with this type of construction, I began my own fenestration research. I quickly realized that the U.S. lagged badly in quality window manufacturing with triple-glazed production being a VERY niche market. At the time of my research, Marvin Windows was arguably the only mainstream company producing stunning frames that met project requirements. Their high quality, of course, came with a forbidden price tag for my project. Thankfully, there was an abundance of custom window manufacturers in the U.S. and Canada to fit the budget.
…Or so I thought
To my dismay, about a third of the local market was reselling Canadian fiberglass profiles. Domestically-made PVC frames either did not meet PH standards or minimalistic aesthetics I was after. Another third were high-quality custom shops whose names can be often found while fanning through architectural magazines like Dwell or AD. The rest were dealers of meticulously produced European-made windows that one can rarely look at before buying. The temptation of the latter was too overwhelming to harness… Six months and about a dozen price quotes later, I finally took a risk and placed an order for German-made tilt-and-turn Passive House certified windows in wood with aluminum cladding. They took about 4 months to arrive but were totally worth the wait.
One of the most exciting days of the project: our awesome custom made triple-glazed windows and entry door have finally arrived from Germany! They took a long time from order placement to delivery in New York port but were totally worth the wait.Window installation is not an easy process, especially when the glass surface is topping 100 sq ft.A monster window that came as one manufactured piece. It measures 8 feet wide and 18 feet tall and took about five hours to properly set in.
Recovery Ventilation System
Added forced ventilation (energy recovery ventilation or ERV) is another attribute of a passive house, thanks to extreme air-tightness. ERV transfers about 50% of humidity between fresh and stale air streams circulating in your house at any given time. This means less dry indoor air conditions during the winter months. It also helps transfer humid air back to the exterior in the summer easing AC loads. Air volume is based on house envelope size, shape, number of corners, open spaces, etc. If ventilation system design is well calculated and done right, installation becomes a very straight-forward process.
Main ventilation unit, a.k.a. “The Octopus”. It’s made by Ultimate Air and supplies fresh air to the entire first floor and master bedroom. The unit was chosen based on its technical spec, power consumption, price, and stringent passive house compliance rules.The front of the ventilation unit has two 8-inch duct connectors for air supply (right) and air exhaust (left). Inside is a large fan with a washable six-pie filter drum. it also has a conventional pre-filter at the air inlet.
Efficiency above all: choosing the right ventilation system
There are quite a few brands to choose from nowadays, from world-known companies to niche market manufacturers. The prices vary considerably, therefore no matter what local dealers tell you, prepare to do your own research to estimate your system needs and installation costs. German Zehnder is always on top of every PH consultant’s list. It is a beautifully designed system and “just works” but it came with a forbidden price tag at the time of construction. But Ultimate Air, Lennox, Panasonic, Honeywell, Aprilaire, Fantech, just to name a few, are all worthy choices. I assume they would all work fine for the NOK project given they have enough power to supply airflow for longer runs.
At the end of our research, we zeroed in on Ohio-based Ultimate Air for overall energy efficiency vs value ratio. It features a rotating drum system with washable pie filters and works well for a fairly large house. Keep in mind the system is not whisper-quiet. Some low operational fan noise from the unit is audible, therefore it is advised to install the units away from the bedrooms or recreational areas of the house.
The second ventilation unit is considerably smaller and exchanges air on the second floor. It serves two other bedrooms, the bathroom, and the hallway.Two pairs of air intake and exhaust with hoods supplied by Ulimate Air.
Building a Carport for a Passive House
Well, this is, without a doubt, one of the best features we had thought of during the design stage. Paying homage to the mid-century iconic structure, it has become rather a convenience element than a design option. It serves many purposes keeping your cars dry, creating a sheltered passage from the car to the house entrance, and making a nice wind tunnel to keep you cool outside in the summer. (ok, the last one may or may not be completely made up). Since it’s a carport for a Passive House, it did have its challenges during construction but we manage to overcome those with the proper insulation.
Garage/carport detail showing the Rockwool COMFORTBATT® being added in the ceiling cavity to create the additional layer of insulation for the master bedroom above.
Avoiding thermal bridging around carport
The carport is located under the master suite and also has an adjacent wall with the workshop. The workshop itself is not a part of the Passive House envelope, so some design decisions had to be made to properly isolate it from the rest of the structure. Since it is directly under a part of a Passive House, it is still insulated on all sides, including the ceiling, making it a semi-conditioned space. To avoid thermal bridging through the master suite floor, the space between the master suite and carport ceiling was double-insulated. First, the floor joist cavity was dense-packed with cellulose. Then we added a 5-inch deep outer “cage” to the carport ceiling and packed it with Rockwool COMFORTBATT® Thermal Batt Insulation. This roughly added R23 to the total insulation value of around R55.
This piece of ZipWall sheathing is one of the most important parts of our house design elements. It connects two parts of a passive house envelope over a non-passive structure (carport and workshop). It will later be taped up and connected to the rest of the sheathing of the master bedroom to create a continuous sealed wrap around two passive house components
Workshop insulation in Passive House
The workshop (that also doubles for a one-car garage) is the only structure that is not a part of the Passive House envelope. It has been designed to structurally support a master suite on the second floor but had to be thermally broken from it by a foot of blown-in cellulose insulation and five inches of Rockwool COMFORTBATT® Thermal Batt Insulation on the exterior wall.
Although technically it is a separate structure, the workshop is treated as a semi-conditioned space and does not require a lot of extra energy to keep constant temperatures throughout the four seasons. It also has an adjacent wall with the carport. The carport itself sits directly under a part of a Passive House. It had to be insulated on all sides, including the ceiling to create a thermal break from the master suite above.
The carport ceiling connects the living space with a workshop that is not a part of the passive envelope. It’s filled with cellulose insulation inside the floor joist cavities and five inches of Rockwool bats in the exterior drop ceiling to create a thermal break for the second-floor master suite.
The rural aesthetics
The black siding all around the workshop is actually white pine boards treated with organic black pine tar and linseed oil mix. It has a thick texture with great coating properties. It penetrates the softwood nicely and creates a durable low-maintenance coating. The siding has remained untouched by elements so far. I expect it to keep its look for at least 5 years without extra oil treatment.
Garage wall with 1x6" white pine siding boards. The boards were treated with organic black pine tar and linseed oil.
The Concept
of a Passivhaus has been around for decades but is still fairly new on the U.S. housing market. It does not employ any special technology but rather follows basic rules of physics to function. It is a voluntary standard for energy efficiency in residential or commercial construction that significantly reduces the ecological footprint. Buildings constructed to Passive House standard need little energy for heating or cooling which maximizes overall house efficiency and performance. Passive design ideation is not a separate phase of construction but rather an integral part of an architectural process.
sw
Wall Construction
Passive House wall construction is not, by all means, an exotic concept. It dwells on an idea of efficiency and energy conservation but great results can be achieved with common construction materials. The walls can be anything from the conventional wood frame to cinderblock to ICF (insulated concrete form). The choices are limitless and will be based on the construction budget. The main requirements are continuous insulation barrier wrapping the house from the ground up and high-performance windows.
It’s in the walls
We opted out for a 2×6 wood frame for the interior wall filled with Rockwool COMFORTBATT® Thermal Batt Insulation. We used Huber ZipSystem® for the exterior sheathing and taped all seams and corners. Another “system” was built on top of the sheathing to hold an exterior insulation. It involved an improvised Larsen Wall construction and was filled with blown-in cellulose.
Typical wall construction.
Breathable concept
The entire exterior was then wrapped in a breathable membrane by SIGA®. In this wall construction concept the ZipSystem® wall sheathing serves as an ultimate moisture barrier between two insulation layers. Any potential condensation inside the interior wall during cold weather periods evaporates into interior where it gets picked up by the whole house ventilation system. By the same logic, any moisture trapped inside the exterior insulation material evaporates out via a breathable membrane and gets picked up by the rainscreen air channel.
All 9.5" vertical i-beams are installed on the outer walls. They are mounted through ZipSystem® directly to 2x6 studs at 32 inches OC. The house is ready for exterior wrap.When the walls were completely wrapped up and sealed, 2x4 boards were run across the walls at 24 inches OC all the way to the roof to create a base for the rainscreen siding “cage” system.The rainscreen "cage" system is installed. The exterior is ready for siding installation. All the windows are also installed.
Flat roof construction for a Passive House
To keep the “boxed” integrity of the concept, the flat roof was designed with a slight pitch towards the back of the house. Because of the total pitch run of 40 feet, the parapet walls had to be raised up to 48 inches at the end of the run. But the back of the roof was kept completely open allowing rainwater to run freely into the gutter system.
“Hot roof” insulation
Roof construction detail.
The flat roof construction is a set of pitched rafters. They are sealed with a special breathable lining by SIGA® on the interior and filled with dense-packed cellulose. The lining keeps blown-in insulation inside the rafter bays from falling down. It also prevents moisture accumulation inside the bays since any moisture can escape through the breathable surface to the interior. On the exterior, the rafters are covered with a more conventional “hot roof” sandwich: roof sheathing + 5” of ISO insulation + commercial-grade TPO layer. The total average R-value of the roof is R80. And while it seems like overkill for our climate, knowing ISO’s subpar performance in colder outdoor conditions the R-80 sounded just about right.
Rainscreen Siding Installation
With the airtight house envelope and exterior insulation specified well beyond building codes, the walls should still be able to “breathe” to the exterior. One of the siding installation methods that work in this case is a rainscreen wall. The rainscreen siding is installed over a system of wooden boards or metal studs built around the exterior. The very thickness of the installed boards creates an air gap separating wall sheathing (with or without exterior insulation) from the siding. Any outside moisture that gets through the siding quickly dries out inside this air channel. By the same logic, if exterior insulation is used, any potential moisture trapped inside the insulation material evaporates out via a breathable membrane and gets picked up by the same air channel.
Pressure-treated wood vs. metal
After a short debate with my PH consultant, we decided to go with the wood option for the rainscreen support system. The 1×4 pressure-treated boards are a considerably cheaper choice than metal and faster to install. Keep in mind once PT wood dries out, it will “play” a bit. Thanks to its 3/4″ thickness, the boards might also shrink and buckle. These dimensional deformations are known properties and should be taken into consideration when choosing siding materials and installation techniques. For instance, long cedar or fiber cement planks will hold up just fine with slight structural movement behind them. Large fiber cement panels might crack at the corners or between mounting holes if not installed properly.
Installing fiber cement siding
To minimize siding maintenance, we decided to go with fiber cement for our rainscreen. As mentioned earlier, the air gap is usually achieved by mounting 1×4-inch pressure-treated spacer boards directly to the wall sheathing. Since we used exterior insulation for our NOK project as well, an extra framing had to be built to “cage” it in. The spacer boards were placed vertically 16” OC around the entire perimeter from top to bottom. Then the siding went directly on top of the spacers using more conventional installation methods.
Fiber cement panel installation: even with the panel temporarily resting on a support board, two people had to hold the panel on the sides while the third person drove the pilot screws in through the pre-drilled holes.
There were two different fiber cement products used for the project. The “wood” planks are 7-1/2” stained boards by Allura. They accept nails (galvanized or SS roof nails work best) and can be installed by one person with the right equipment. The large grey panels are 4×8-foot sheets of color-through fiber cement that we had to order overseas. The panels proved to be rather heavy at 92 pounds each and needed three people to install. We used scrap wood boards to create temporary supports and used pilot screws to keep the panels in place. One of the crucial parts of the process was to find the right fasteners for the job. Multiple online resources lead me to SFS Intec. Their products are specifically designed for concrete and cement board fastening, they are self-tapping stainless screws with a great “bite”. They can also be ordered with painted heads to match your siding color.
Important considerations
When installing large fiber cement panels, make sure your 1×4 structural boards are covered with a layer of EPDM-like underlayment strips. They help a lot with the panel movement over time and minimize pressure points. For the same purposes, make sure your mounting holes are about 1/16″ larger than the screw thread diameter. I know it can be very tempting at times but DO NOT OVERTIGHTEN THE SCREWS! Set your screwdriver at different power settings and try it on a couple of mounting samples before the real installation.
The rainscreen system is built around the house with pressure-treated "spacer" boards to install siding on.Pilot fastener to hold the fiber cement panel in place.SFS Intec stainless fasteners with painted heads to match the panels.
But Why?
Well, the crisis of the middle age can manifest itself in mysterious ways (I could have probably bought a gently used Lambo instead). Simply put, the enormous value of the knowledge I was about to acquire paired with great pride and a thrill of the unknown challenge overpowered my rational thinking.
But seriously, I always wanted to design and build a home for my family but was not entirely thrilled with what the construction market had to offer. Having a background in architecture, I understood the basics of the construction process. I also understood a lot of additional knowledge was needed to take a step away from the ordinary. So I embarked on a two-year journey of market research, current construction trends, and material sourcing. I soon came to realize I didn’t have to dig too deep to find the data I was looking for. Innovative building techniques do exist on U.S. market if you dare to break the mold of a sample home by a national builder. Despite measurable attempts to disrupt the industry, a lot of those new concepts fall short on market penetration which, in a lot of cases, is still in the single digits.
nw
Flat Roof Rainwater Management
Not all flat roofs are created equal. We did not want to risk waterproofing properties of ours by creating back scoopers to direct rainwater into the downspouts. Instead, we went with the open concept by eliminating back parapets and letting the rainwater pour into the conventional gutter system and then channeled into the underground drain. The number and size of the downspouts were calculated based on the roof’s area and pitch. Here is a closer look at the Passive House roof construction.
Flat TPO roof with no back parapet.
Helpful rainwater draining considerations
Unfortunately, periodical gutter clogging from nearby maple trees made rainwater spill over the gutters during a hard rain. After unsuccessfully trying out all available and more trivial solutions, I came across the downspout extension by InvisaFlow. Instead of blocking leaves and any tree debris at the downspout entry points (our main reason for clogging), it lets it go through downspouts freely and has a catch-all filter at the bottom. This allows easy access for occasional cleaning and saves me from unnecessary trips to the roof. It also keeps the gutters relatively clean.
This handy downspout extension by InvisaFlow solved our issues with rainwater management. You can add splash guards later on (not shown) to better direct water into the drainage system.
Efficient HVAC System
Going “passive” always means choosing the best energy-efficient equipment possible. And the larger the house, the more complicated this task gets. Mechanical system calculation often ends up being either not efficient enough or too expensive to install. A suitable compromise is a mini-split system that can be programmed for each room or number of rooms that get heated or cooled off of the same unit.
Main multi-zone MXZ mini-split unit by Mitsubishi.
Considering Mini-split system
For our house envelope, we ended up using two units, both by Mitsubishi: the maximum capacity multi-zone model that pretty much covers our main 40×40-foot open-space cube and the smallest available wall-mounted head for the master bedroom. For the latter, the decision was made to split the service due to the bedroom’s semi-autonomous location with extended duct runs and considerable heat loss. In the end, this solution worked out great and did not draw a lot of extra power. As a bonus, mini-splits can run in “Drying” mode when outside temperatures get lower but the house still retains higher RH values. This setting still dehumidifies the air and lowers the indoor temperature just a bit but the fans are running at much lower speeds reducing electrical bills even further.
In conclusion, it has been a few years since the house was occupied, and the system has performed exceptionally well so far. Considering a fairly larger house envelope comparing to our previous dwelling and electricity as the only energy source, our average monthly electric bills are still almost twice a low.
A separate wall-mounted unit for the master bedroom.The HVAC system has two air handlers and an extremely quiet outside unit. Two identical air handlers are placed in the basement and second-floor laundry (shown).
Surface penetrations in Passive House
With the Passive House house envelope being completely air-tight, any wall or roof surface penetrations become less than desirable due to a possible thermal bridging or an air leak. But that is not to say that a chimney is out of the question, for instance. With certain precautions and extra insulation, some necessary openings to the exterior can be achieved without compromising Passive House efficiency.
Sealing all points of entry
Our ventilation system required two sets of air intake and exhaust. There are two plumbing vent stacks and one chimney flue coming through the roof. And finally, there is laundry. For the latter, we really tried to go with a very efficient self-condensing unit that does not require exhaust but some well-known drawbacks (mainly the time it takes to wash and dry along with the average unit capacity) took it out of consideration. So we ended up going with a more conventional double-unit with 4” exhaust pipe to the exterior. We pack extra insulation around the in-wall portion of the laundry exhaust to keep condensation away from the walls.
Wall penetrations for large openings and electrical wiring: tape every slit, every mechanical puncture, and every crevice around protruding objects with adhesive tape.
In addition, there were rather small openings for electrical wiring, plumbing, and HVAC equipment. With all wall penetrations taped up tightly with SIGA® adhesive tape, the door-blowing test did not show any significant air leakages at those entry points.
Keep in mind that the number of wall penetrations will vary depending on the dwelling’s square footage, the number of ventilation units, and one’s desire to sacrifice laundry drying time for efficiency.
Chimney flue roof penetration.Plumbing vent stack on TPO roof
The Power of Knowledge
Ever since the house has been occupied in late 2017, not a single day passed by without me contemplating the effort and the results of this adventure called residential construction. It’s been tough, it’s been fun, and so far, no regrets on record.
The house continues to perform well on energy efficiency despite its considerable actual footprint and an open-space design. But, of course, the million-dollar question is…well, did it break the bank? The answer to this question lies somewhere between a basic understanding of Passive House principles, materials and labor involved along with your attitude towards unconventional construction. For me, it struck a delicate balance with this 3-variable equation which means that at the end we roughly spent the same amount of money buying a similarly-sized 2×4 stick frame directly from a local builder. And to me – that’s a win!
Gallery
View all
View all
foundation
frame
fenestration
mechanical
exterior
The first foam block is getting set up under the house foundation. The foam is 40psi and 8” thick to withstand the weight of the concrete footings. It serves as the first and arguably main thermal break between the ground and foundation.
Foam is completely laid out underneath the future foundation. The foam block structure is held in place by fiberglass rebar stakes to eliminate the possibility of the thermal bridging and make concrete pour safer.
The rebar system for the future footings is set up on top of the foam blocks.
The house foundation is finished. The separate footings and concrete forms are seen in the picture are for every column that supports the entire structure with foam blocks under each.
When the basement walls are poured in, it’s time to insulate the wall exterior with the foam blocks. These are 25 psi, 5” thick sheets that are glued directly to the concrete surface.
We ran two staggered layers of foam blocks around the entire wall surface. The total thickness of wall insulation is 10” with R-value at around R50.
The completed look of the exterior insulation. Notice the continuous wrap around the footing to create a foam “coat” for the basement walls.
The next step is to protect the walls from water penetration. The foam itself creates a semi-impervious surface but it is not completely water-resistant. To create a water seal around the walls we used a thick vinyl membrane with a synthetic bitumen layer that sticks to the foam to create a continuous seal. The wrap is sold in rolls and is tailored to specific outdoor temperatures, so be sure to use the season-appropriate version at the time of application.
One of the most important aspects of a passive house is an air leak-free structure. One has to be very meticulous at locating and sealing any openings at any construction stage. Be prepared for multiple runs around the house with sealing tapes patching any considerable holes, cuts, and wall-to-wall connections. Here is an example of a sealed connection between the top flap of the water membrane and the exterior wall.
Another example of a sealed connection at the sill plate level. It is ok to over-patch at trouble spots like corners, roof connections, and window openings.
In order to create a continuous thermal break, the basement floor has to be insulated as well. We used roughly 150 bags of construction grade perlite laid out and compressed into 8” “bricks” to create a base insulation layer under the slab.
A thin layer of gravel was poured on top of perlite bags to level the surface.
2” thick EPS insulation sheets were laid on top of the gravel.
12 mil plastic sheet is used as a vapor barrier. The barrier must overlap at basement edges and have a flap of about 12” high against basement walls. This strip serves as a connecting piece when joined with sealing tapes at the finished slab level.
Finished basement slab with vapor barrier still seen on the walls.
EPDM sealing gasket used under the sill plate of the entire house perimeter. Another air leak barrier that must be used to satisfy passive house standards. These are available in different widths to accommodate standard wall thicknesses.
A thermal break is shown around the garage foundation. The garage is not a part of the passive house structure but supports the master bedroom above. To make the bedroom warmer space below has to be semi-conditioned. This has been achieved by heavy insulation around garage walls and ceiling in addition to the bedroom floor itself.
All load-bearing walls are conventional 2×6 construction reinforced at the corners and cantilever overhangs for stability during windy conditions.
Two 5-foot cantilevers and a second-floor deck built.
A closer look at the main cantilever. It is 25 feet across with a 5-foot overhang. There are multiple Parallam beams spreading the load. They run for over ⅔ of their total length inside the structure resting on load-bearing walls.
Second-floor beams running across from the main structure over carport and garage to support future master bedroom on top.
This piece of ZipWall sheathing is one of the most important parts of our house design elements. It connects two parts of a passive house envelope over a non-passive structure (carport and garage). It will later be taped up and connected to the rest of the sheathing of the master bedroom to create a continuous sealed wrap around two passive house components.
Second-floor wall construction is in progress.
Flat roof trusses are laid out. The longest run for the trusses in the main roof area is almost 40 feet with a continuous pitch of 1/4:12 which translates to 1/4 inch rise to 12 inches of run.
Roof sheathing with parapet walls being built. We left the back wall completely open to allow water to run freely into the gutters.
One of the three main columns lined up to support the weight of the entire structure. This helped create the desired open space on the first floor with a total of 600sf of open area.
Wall construction detail: 2×6 load-bearing wall on the inside with 9-inch beams hanging on the exterior. These beams later created cavities for blown-in cellulose insulation. The ZipWall sheathing separating this wall “sandwich” serves as a moisture barrier. The exterior insulation layer is covered with a breathable wrap to let any accumulated moisture escape to the outside.
All wall-to-roof connections are sealed with tapes to ensure an air leak-free envelope.
Breathable interior wrap is used to create sealed roof cavities for blown-in cellulose insulation. This is in addition to 5-inch sheets of ISO foam on top of the roof that is commonly used as padding for TPO roofing.
All cuts and seams in the wrap are meticulously taped up.
One of the most exciting days of the project: our awesome custom made triple-glazed windows and doors have finally arrived from Germany! They took a long time from order placement to delivery in New York port but totally worth the wait.
Window installation is not an easy process, especially when the glass surface is topping 100 sq ft.
A monster window that, to everyone’s dismay, came in one piece. It measures 8 feet wide and 18 feet tall and took about five hours to properly set in.
Our glass wall view from the outside at night.
The example of standard window installation with supplied metal brackets and wooden adjustment blocks. All operable windows around the house came with tilt-n-turn mechanisms and insect nets.
The exterior view of the installed windows with sealing tapes around them. They will be double-insulated with foam blocks from inside and outside before installing aluminum trims.
Main ventilation unit, a.k.a. “The Octopus”. It’s made by Ultimate Air and supplies fresh air to the entire first floor and master bedroom. The unit was chosen based on its technical spec, power consumption, price, and stringent passive house compliance rules.
The front of the ventilation unit has two 8 inch duct connectors for air supply (right) and air exhaust (left). Inside is a large fan with a simple filtration system.
The second ventilation unit is considerably smaller and exchanges air on the second floor.
The HVAC system is a mini-split with two air handlers and an extremely quiet outside unit. Two identical air handlers are placed in the basement and second-floor laundry (shown).
Mini-split outdoor unit by Mitsubishi. Super quiet and super efficient.
A separate in-wall mini-split unit for the master bedroom. The decision was made to split the service due to the bedroom’s semi-autonomous location and extended duct runs. In the end, it worked out great and did not draw a lot of extra power to the unit.
All vertical beams are installed on the outer walls. They are mounted directly to 2×6 studs at 32 inches OC. The house is ready for exterior wrap.
Exterior wrapping has begun. All seams are overlapped by 3 inches and sealed with tape.
When the walls were completely wrapped up and sealed, 2×4 boards were run across the walls at 24 inches OC all the way to the roof to create a base for the rain screen siding “cage” system.
Continuation of exterior wrapping.
Another layer of vertical 1×4 PT boards is mounted directly on top of 2×4 base. After cellulose insulation has been blown into the cavities left inside the exterior warp, the house was ready for siding.
We have decided to install two separate siding materials: large 4×8-foot fiber cement panels and stained fiber cement planks. Both of those were mounted directly to the vertical 1×4 boards. Although the ones that accepted large panels were also covered with the additional EPDM padding layer per installation instructions.
All necessary wall penetrations were pre-cut and sealed prior to exterior panel installation.
All connections between different types of siding were either trimmed with drip edges or terminated with aluminum corners.
The entire order of foam blocks and sheathing is waiting to serve its great purpose.
Blower door tests are essential for passive house construction. They help determine a home’s airtightness.
One of the two packages our staircase beams came in. Each weighing about a thousand pounds, they took a crew of seven people to install. And yes, we had a winch….and yes, it failed miserably.
The first-floor staircase beam is installed. The staircases came in partially pre-assembled with step brackets bolted in. The three and a half inch hickory butcher block steps were later connected to the brackets using eight structural screws per step.
QUESTIONS?
Let’s keep this conversation going!
I would be more than happy to answer any questions or respond to any comments you might have. It was an invaluable experience, worthy to be shared with anyone interested in unconventional construction.